DMARC: What, Why, and How to Set it up?
Understand what DMARC is, why it matters, and how to set it up to protect your domain and improve email deliverability.
Setting up DMARC is a critical step in protecting your domain from spoofing, phishing, and impersonation. It also strengthens deliverability by signaling to inbox providers that your domain follows proper authentication standards.
This guide explains what DMARC is, how it works, and how to set it up correctly.
What Is DMARC
DMARC is an email authentication protocol built on SPF and DKIM. It tells receiving servers how to handle emails that fail authentication checks and sends reports back to the domain owner.
Instead of leaving the decision to inbox providers, DMARC allows you to define the policy.
Why DMARC Is Important
DMARC helps:
Prevent attackers from sending emails using your domain
Protect recipients from phishing and impersonation
Improve inbox placement by increasing domain trust
Provide visibility into authentication failures
Domains with properly configured DMARC are generally trusted more by email providers.
How DMARC Works
When an email is sent, the receiving server checks:
SPF to verify the sending server is authorized
DKIM to verify the message was not altered
If one or both checks fail, the DMARC policy determines what happens next.
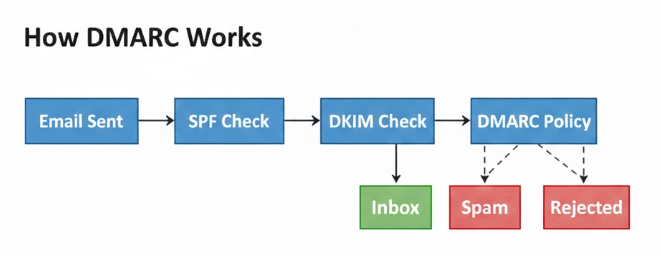
Policy options:
None – Deliver the message normally but send reports
quarantine – Deliver to spam or junk
reject – Block the message entirely
How to Set Up DMARC
Step 1: Create a DMARC Record
DMARC is added as a TXT record in your domain’s DNS settings.
Log in to your domain provider or DNS manager.
Navigate to DNS or Manage DNS settings.
Add a new TXT record with the following structure.
Host or Name
_dmarc.yourdomain.com
Value example
v=DMARC1; p=none; rua=mailto:[email protected]; ruf=mailto:[email protected]; sp=none; fo=1
Replace yourdomain.com with your actual domain.
Understanding Common DMARC Tags
v=DMARC1: Specifies the DMARC version. This must always be DMARC1.
p: Defines the policy action. Possible values are none, quarantine, or reject.
rua: Email address where aggregate reports are sent.
ruf: Email address where forensic reports are sent.
sp: Defines the policy for subdomains.
fo: Controls when failure reports are generated.
Step 2: Save the DNS Record
Paste the DMARC record into the TXT record section of your DNS settings and save the changes. DNS updates may take some time to propagate.
Step 3: Verify Your DMARC Record
After saving, verify that the record is live.
You can use tools such as MXToolbox to check your domain’s DMARC status and confirm the record is correctly configured.
Step 4: Monitor and Adjust Your Policy
Once DMARC is active, you will start receiving reports that show who is sending emails on behalf of your domain and whether they pass authentication.
Review these reports regularly to identify unauthorized senders or configuration issues.
After monitoring, you can gradually strengthen your policy by moving from none to quarantine and eventually to reject.
Which DMARC Policy Should You Choose
If you are setting up DMARC for the first time, start with the none policy. This allows you to collect data without impacting email delivery.
Once you are confident that legitimate senders are properly authenticated, you can move to quarantine.
For maximum protection, use reject, but only after confirming all authorized senders are correctly configured.
Final Thoughts
DMARC is one of the most effective tools for protecting your domain and improving email deliverability. It provides visibility, control, and security while helping inbox providers trust your emails.
When configured correctly and monitored regularly, DMARC can significantly reduce spam abuse and strengthen your overall email reputation.
Also check
Understanding DNS Records for Email Deliverability
What Is an SPF Record
DKIM: What, Why, and How to Set it up?
Technical Checklist Before Starting Email Warm-up